2019/12/19

Micropod2 + DRB3 Review on 2005 Crossfire SRT6

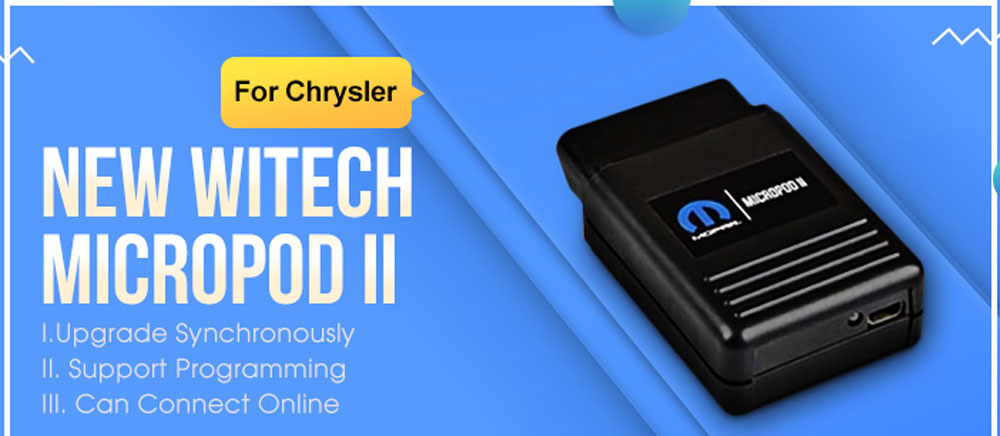
I have purchased and used this product on 2005 srt6 coupe and 2007 ltd roadster (us versions). It takes some work to get the software set up. But once you do, it works fine. This Micropod 2 Clone works with the Enhanced DRB 3 Emulator.

Background:
I am just a Crossfire owner who is unhappy with my dealers (lack of) service. They charged me $75 to say they couldn’t relearn my TPMS, and then estimated an additional $300 (parts only) to replace a TPMS module that I didn’t need. It felt good to be able to do the work myself, and not have to depend on them. That alone was worth the money I spent.

Purpose:
I have only used the emulator to perform a TPMS Relearn (2005 SRT6) and diagnose a defective air bag control module (2007 Roadster).

Cost:
About $170 (plus win 7 or XP laptop).

You will need:
1) Good computer knowledge
2) A laptop with a clean Windows XP or Windows 7 installation on it. Nothing else. Networking and Updating turned off.
3) A Micropod 2 Clone:
http://blog.obdii365.com/2018/06/16/install-drbiii-emulator-for-micropod-2-on-windows-7/
5) A TPMS tool to “chirp” the sensors so the vehicle can read them (I use the Autel TS601)
6) Perform a TPMS Relearn sequence using DRB III Emulator. Chirp each wheel when requested by the emulator. (Takes about 5 minutes)

Laptop:
Any of those laptops should work fine. I am using Windows 7 installed on a used laptop I got on ebay for about $100.
Operating system:
Win 7 recommended and some say Win 7 Professional, and some say XP… it is confusing. And I wish it wasn’t that way. And I also didn’t find the manufacturer’s customer service representatives to be very helpful (email only). There is a one day delay between here and China to get a response. They said only windows XP or Windows 7 (32 bit) would work.
My eBay laptop came with a Solid State Drive with Windows 7 Professional (64 bit) installed. Turns out my laptop with Windows 7 Professional (64 bit) works just fine. I did have to do a little tweaking, which I am not sure I would have had to do if I was using windows XP or Win 7(32 bit).
I am still working on my other project, but I will try to provide an answer to your previous ABS brake bleeding question as soon as I can (probably tomorrow).


Assistance:
If you purchase the Micropod 2 unit and have some questions, obdii365.com will provide some assistance and try his best to help. He is however not an expert, seller only. Also, I’d like to help you out if possible.


Test and result:
Unfortunately, I can not find any option to bleed the brakes in the ABS section of the DRB III emulator.
I ran the emulator on my 2005 SRT6 Coupe and tested the ABS function. Attached is a printout of all the ABS functions and the options for testing and diagnostics under each of those functions. Unfortunately, I did not find any option to bleed the brakes. Searched a lot then I was indicated Brake Bleeding is located in the ABS Section under Miscellaneous Functions. However, when running the emulator in Crossfire mode only the following options are listed under Miscellaneous Functions:
1) Erase Zero PT-Offset Error,
2) Relearn Steering Angle.
micropod2-drb3
Using DRB III Emulator with Chrysler Crossfire Options available under ABS – Miscellaneous Functions
2019/10/10

Chrysler Witech Scanner– ADVICE from Expert

Because i work with FCA diag software on a daily basis i can share some experience.
There is a standard adopted by most automakers in 2002? So just about any cheap chinese obd tool (if it supports the appropriate communications protocol) can read basic trouble codes populated on the databus. But that s all.
To dig deeper into other control units, make adjustments and programming you need more sophisticated devices
When talking about OEM tools, then for almost anything up to 2005 (some dodge trucks up to 2007) you need a DRBIII
WiTech DRB Emulator is NOT a 100% replacement for a real DRB Scan tool.
From 2007 up to 2009 you can use StarScan or StarMobile. basicaly the same device with the same capabilities. The only difference ist that Starscan is a standalone handheld unit with color LCD and Starmobile uses the VCI pod as an interface and needs a PC as a desktop client. Now obstolete, no FCA support nor flash files anymore.
Still both work pretty well in standalone mode, you can do almost anything dealer can, except flashes.
WiTech (or WiTech1) – can use the same communication interface as starmobile did. Or can use the new Micropod. Can work in standalone mode. Supports vehicles up to 2015. Again, can do just about anything the dealer can, including flashes (if you have paid access to techAuthority service). Lot of clones on the market, also same used units from closed dealerships…
BUT!!! You go online and play with FCA and do not have registered micropod or VCI pod it will be rendered locked and useless.
Todays state of art is Witech2.
This is online only solution. No standalone software or application. Works with just about any internet browser or operatiing system (win, apple, unix, linux android…..) Does not work without internet connection.
Uses the same micropod2 bud you need an utility to change firmware. this can be done only once. So if you still plan to use Witech 1, you need another micropod which will be dedicated to Witech2 only.
Then you need a $$$ subscription from FCAWitech. In USA it is also available for an aftermarket shops, in Europe it is a dealer-only option.
Works also with some clones, but it is a hit/miss. Good clones whicch work run about $500 in the net. Not cheap, but still better than $1800
This is a decent micropod 2 china clone: (it’s sp271-c)
Regarding the AppCar FCA software – it works. I know who made it and have a multi license version (not single vehicle). can do a lot but not everything.
But in some cases it can go beyond the capabilities of dealer tools.
You can change gear ratios, tyre circumference/size, enable/disable TPMS, program DRL, program voltages for PWM (good for LED headlamps) and a lot of other stuff.
Quite long post, but hope someone finds this info useful


Attachment: witech abilities

wiTech
DTC Code Retrieval
Retrieve OE DTC with code DefinitionX
Link DTC to service informationX
Customizable PID displayX
Retrieve and display Mode 6 DataX
Data Logging
BodyX
ChassisX
ElectricalX
PowertrainX
Pressure/Vacuum Tests
Bi-Directional tests
BodyX
ChassisX
ElectricalX
PowertrainX
Network Tests
Network TopographyX
CANX
CCD BUS
SCI BUS ISO 9141
PCI BUSX
Module Programming
Programmable Module Installation (PMI) proceduresX
Module Reprogramming (Reflash)X
CodingX
Supplemental restraints initializationX
Programmable Parameters ( ability to change in service settings i.e., tire size, personality, customer convenience etc.X
Body Controls
Anti-theft System FunctionsX
Remote Keyless EntryX
Factory Keyless Entry CodeX
Restraints (supplemental restraints and seat belts)X
Chassis Tools
ABS Service BleedX
ABS/ Brake system functionsX
IVD Initialization Sequence
Ride Height Calibration ( for vehicles with pneumatic or hydraulic ride height controls)
Tire pressure monitor functionsX
Cruise Control System testsX
Electronic Ride controlX
Electrical Tools
Charging System TestsX
Parking Aid TestsX
AudioX
Powertrain Tools
EVAP TestX
Force monitors to run
Fuel Economy Test
Fuel System Test/Relative Injector Flow TestX
Bi-directional control of fuel componentsX
Bi-directional Ignition System controlX
Power Balance TestX
Relative Compression TestX
Transmission bi-directional TestsX
Engine Checks and OBD Tests (Drive Cycle, Mode 01, Mode 06 & Mode 09)X
EGR TestX
Digital Multimeter
Basic DMM functions
Current measurements (50 Amps/500 Amps)
Pressure/Vacuum measurements
Oscilloscope Tools
Oscilloscope
Alternator ripple
COP (Coil-On-Plug) stress test
http://blog.obdii365.com/2019/10/10/jeep-chrysler-witech-advice-from-expert/

2019/09/11

Possible to set up CDA with Micropod 2?

Here, we’ll talk about Micropod 2 with CDA (Chrysler Diagnostic Application) program.
chrysler-diagnostic-application
Here is one thing I know, and one thing I’ve been told. I can verify that cda 6 works with up to date registered vci pods, If you somehow were able to get that software and log in credentials that is….. Now as for micropods … I was told by someone that micropods will work with older cda version 5.xxx but only a special kind of micropods . There are 3 different types of micropods that I know of. The first is loaded with operating system for wiadvisor , these are used by service writers on the dealership service drive , they can do a few basic functions such as read and erase codes check for recalls and soo on. The back of the pod has a different prefix on it then the full function scan tool for technicians , The service versions have a prefix of wsp-xxxx on the back. (I think these might work on cda 6 but can not verify that, it is just a guess) . The wsp version micropod does not work with version 5, you get a missing key error on start up. Now on to the version of micropod that I was told does work with cda 5 and that is a corporate version , it is used at the plants and was used by field engineers as well , these pods are red in color, this is the version I was told will work with cda5. I have not verified that so use that info at your own risk, I also do not know if there are different firmware versions of that micropod that are compatible. Hope that helps. There is also a wcp version micropod, Im not sure where that falls into the category.

The VCI Pod clone firmware is 3.1.2 and comes with WiTech 13.03.38, but should be able to be updated to 4.1.7/14.02.56 without issue. I only bought this to run CDA as I’m running WiTech v16 with a real VCI Pod. At this point, I’m really only concerned with MY2009, so my current setup is good for my purposes.

well meganz accounts are free, don’t know how big files yahoo mail allows, anyways if anyone wants links to the versions(witech 1.0 install software) I have here are the links
MEGA (12.01.63)
MEGA (12.01.109)
MEGA (13.02.34)
MEGA (16.05.15)
MEGA (17.01.18)
https://mega.nz/#!ZCJRQAYT!fVPAE7SNt…94-vPGpK1Iu3lg (17.04.27)
I have some old starmobile software too but haven’t uploaded it yet.
This is a cracked version of witech 17.03.10 You must remove all files of any previous version and then install you install the program and then you go to programfies (x86)/DCC Tools/WITECH/client here you delete the file app-config.xml
and you replace it with the file included in the download,

Note that any version of FW for VCI and Micropod 2 is compatible with CDA. Just need be a bit modified. A decent Micropod 2 should be like: http://www.obdii365.com/wholesale/witech-micropod-2-for-chrysler.html

2019/09/08

Advice: 2005 Chrysler Crossfire on DRBIII running Micropod 2

This is advice for someone tries to run DRBIII emulator on Micropod 2 for 2005 Chrysler Crossfire European.

Question:
Was reading online about the diagnostics of our fine vehicles and bumbed into a blog post stating a working emulator for Crossfire:http://blog.obdii365.com/2017/12/02/set-up-witech-micropod-2-with-drb-emulation/
and
http://blog.obdii365.com/2018/06/16/install-drbiii-emulator-for-micropod-2-on-windows-7/
My XFire is 2005 and european, so it definitely is RDB III, was just wondering can someone verify the possibility of this being legit or have I misunderstood something ?

Answer:
Yes, I have purchased and used this product on 2005 srt6 coupe and 2007 ltd roadster (us versions). It takes some work to get the software set up. But once you do, it works fine.

This Micropod 2 Clone works with the Enhanced DRB 3 Emulator.
Cost is about $170 (plus win 7 or XP laptop).

Any of those laptops should work fine. I am using Windows 7 installed on a used laptop for about $200: http://www.obdii365.com/wholesale/new-second-hand-lenovo.html
If you purchase the Micropod 2 unit and need some assistance, or have some questions, I will be happy to try my best to help. I am however not an expert. I am just a Crossfire owner who is unhappy with my dealers (lack of) service. They charged me $75 to say they couldn’t relearn my TPMS, and then estimated an additional $300 (parts only) to replace a TPMS module that I didn’t need. It felt good to be able to do the work myself, and not have to depend on them. That alone was worth the money I spent.

You will need this:
1) Good computer knowledge
2) A laptop with a clean Windows XP or Windows 7 installation on it. Nothing else. Networking and Updating turned off.
3) A Micropod 2 Clone
4) Follow these instructions
5) A TPMS tool to “chirp” the sensors so the vehicle can read them (I use the Autel TS601)
6) Perform a TPMS Relearn sequence using DRB III Emulator. Chirp each wheel when requested by the emulator. (Takes about 5 minutes)


I have only used the emulator to perform a TPMS Relearn (2005 SRT6) and diagnose a defective air bag control module (2007 Roadster). I have tested some other diagnostic functions, but I am not very familiar with its additional capabilities. I think it will perform many other DRB III functions.

2019/08/01

wiTECH 2.0 cannot Communicate with Any Module Solution

Here are some solutions of Micropod wiTECH 2.0 communication failure with all modules.

Theory of operation:
Below are few different ways communication on a vehicle takes place:
  • Scan tool to the Central Gateway Module (Ex: SGW, TIPM, BCM, etc.)
  • Module to Module
  • Module to Device
  • Device to Module
Communication to the vehicle is established with a Micropod 2 scan tool, through the Data Link Connector (DLC) to the Central GateWay Module (CGW) over the Controller Area Network (CAN) Bus.
On this vehicle the Body Control Module (BCM) is the CGW between the high and low speed CAN Bus networks (CAN-C and CAN-IHS); and communicates with the scan tool through CAN C.
witech-cannot-cummunicate-module
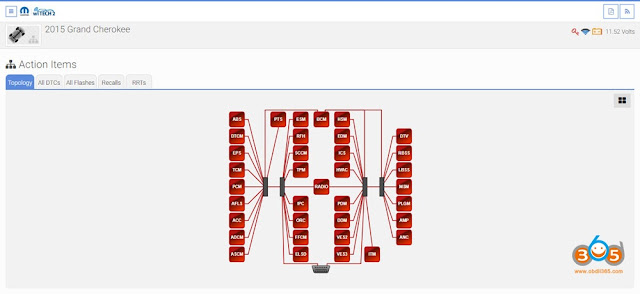
The CAN Bus architecture of this vehicle operates in a “hub” or “star” style, meaning all of the modules are connected at a central point in the Star Connectors. The terminating resistors for CAN Bus are located in the Star Connectors that are part of the body and instrument panel wiring harnesses. In other CAN Bus architectures a vehicle may operate in a “stub” or “backbone” style, meaning there is a single, main line that connects all modules. The terminating resistors for CAN Bus in the “stub” or “backbone” style are located in 2 separate dominant modules that are placed as far apart as is physically possible. The scan tool becomes another module on the vehicle’s networks by acting as the Master Module of all Bus networks while connected to the DLC  and contributes voltage to the operation of the CAN Bus.

The following vehicle interactions listed below will aid in predetermining the type of vehicle communication that is/isn’t available:

NOTE: If the Hazard Lamps and Headlamps are active, this indicates the BCM is functioning and is most likely not the cause of the CAN Bus fault.

  • Operating the Lock/Unlock button of the FOB with Integrated Key (FOBIK)
When any one of the Remote Keyless Entry (RKE) transmitter buttons of the FOBIK are depressed, the onboard transmitter generates a high frequency RF request signal that is received and validated by the Radio Frequency Hub Module (RF Hub). If the RF Hub determines the RKE transmitter RF request signal was generated by a FOBIK that is valid for the vehicle, the RF Hub relays electronic request messages to the BCM over the CAN BUS to invoke the functions or features associated with the request.

  • Opening a Door
The Door Latches contain Ajar Switches that are hardwired to the BCM. The status of the Door Ajar Switch Sense circuit input is monitored by the BCM, which then sends the proper electronic message to other modules in the vehicle over the CAN Bus.

  • Turning the Headlights on
The Headlamp switch uses a single resistor multiplexed output to control the many functions and features it provides. The switch receives a clean ground from the BCM on a Headlamp Switch Multiplex (MUX) Return circuit. The BCM then reads the switch outputs using an internal pull up on the Headlamp/Fog Lamp Switch Signal circuit to control the exterior lighting functions

  • Turning the Hazard Lamps on
The status of the Hazard Switch is continually monitored by the circuitry within the Instrument Panel Switch Bank in the Integrated Center Stack (ICS). The switch receives battery voltage at all times through a Fused Battery Feed circuit, and a path to ground at all times through the Instrument Panel wire harness. Whenever the Hazard Switch is in its latched and lowered position, the hazard warning system is selected and the switch bank circuitry provides a hardwired output to the BCM. When the BCM receives a Hazard Switch input, it then controls hazard warning system operation and flash rate by controlling battery voltage outputs through high side drivers on the Right and Left / Front and Rear Turn Signal Feed circuits.

  • Honking the Horn
  • Each Horn has a path to ground at all times through its wire harness connection to an eyelet terminal secured to the body sheet metal. The Horns are controlled by a Fused B(+) output received through a relay within the front Power Distribution Center (PDC) Assembly and controlled by the BCM.
During an ignition cycle, the CAN C Bus network may go into default mode when communication has been hindered with the BCM. In some situations, when this happens the wipers automatically operate in a delay mode and the Headlamps are activated by the BCM. When the ignition is turned off, the vehicle will exit the default mode and operation of the Wipers and Headlamps will stop. When turning the ignition on again, if the CAN C Bus fault is still present, the vehicle will exhibit a no crank, no start condition; and no scan tool communication response to the vehicle.

Possible reasons:
  • INOPERATIVE SCAN TOOL
  • MANUALLY SELECTING THE INCORRECT YEAR AND/OR MODEL WITH WITECH 2.0
  • DATA LINK CONNECTOR (DLC)
  • DATA LINK CONNECTOR FUSED B (+) CIRCUIT OPEN OR HIGH RESISTANCE
  • DATA LINK CONNECTOR GROUND CIRCUIT OPEN OR HIGH RESISTANCE
  • CAN C (+) BUS CIRCUIT OPEN, SHORTED OR HIGH RESISTANCE
  • CAN C (-) BUS CIRCUIT OPEN, SHORTED OR HIGH RESISTANCE
  • POOR TERMINAL CONTACT OR CONNECTOR CONNECTION(S)
  • STAR CONNECTOR
  • ANY MODULE ON THE CAN C BUS

NORMAL CAN C BUS CIRCUIT VOLTAGE TABLE
  • CAN C BUS LOW (-) : 1.5 – 2.5 volts
  • CAN C BUS HIGH (+) : 2.5 – 3.5 volts
  • Difference Between CAN C BUS (+) and CAN C BUS (-) : 0.5 volt

  • CAN B or IHS BUS LOW (-) : 1.5 – 2.5 volts
  • CAN B or IHS BUS HIGH (+) : 2.5 – 3.5 volts
  • Difference Between CAN B or IHS BUS (+) and CAN B or IHS BUS (-) : 0.5 volt

  • CAN C1 or C2 BUS LOW (-) : 1.5 – 2.5 volts
  • CAN C1 or C2 BUS HIGH (+) : 2.5 – 3.5 volts
  • Difference Between CAN C1 or C2 BUS (+) and CAN C1 or C2 BUS (-) : 0.5 volt

2019/07/28

How to Flash an ECU with Enhanced DRB III Emulator?

This is about flashing an ECU using Enhanced DRB III Emulator
Disclaimer:
obdii365.com cannot provide TechTOOLS for you guys.
Just share the way with you all
Pls search TechTOOLS on Google.

  1. Open TechTOOLS
  2. Search by VIN or YME
  3. Select the “DRB III Emulator” checkbox
  4. Select the desired flash
  5. Select “Download / Update”
flash-ecu-with-drb3-1
  1. When the download completes, close the download prompt
  2. On the same computer, launch the Enhanced DRB III Emulator from the wiTECH 17.04.27application
flash-ecu-with-drb3-2
  1. In DRB III Emulator, Select “7.  Vehicle Flash”
flash-ecu-with-drb3-3
  1. Select “Flash Powertrain” or “Flash Non-Powertrain”
  2. Select “Start”
flash-ecu-with-drb3-4
  1. Address the prompts to progress through the flash process
  2. When the flash completes, close the complete prompt.
  3. Clear DTCs

If you encounter any error when trying to do a power train flash to a DRBIII vehicle with the DRBIII emulator, delete all files from the Low Folder.
(Some computers might have the folders hidden. To Show hidden files and folders, please follow the steps below)

Windows 10

  1. In the search box on the taskbar, type folder, and then select Show hidden files and folders from the search results.
  2. Under Advanced settings, select Show hidden files, folders, and drives, and then select OK.

Windows 8.1

  1. Swipe in from the right edge of the screen, then select Search (or if you’re using a mouse, point to the upper-right corner of the screen, move the mouse pointer down, and then select Search).
  2. Type folder in the search box, then select Folder Options from the search results.
  3. Select the View tab.
  4. Under Advanced settings, select Show hidden files, folders, and drives, and then select OK.

Windows 7

  1. Select the Start button, then select Control Panel > Appearance and Personalization.
  2. Select Folder Options, then select the View tab.
  3. Under Advanced settings, select Show hidden files, folders, and drives, and then select OK.

RESOLUTION
Step 1: Navigate to the following folder:
C:\Users\<User_Account_Name>\AppData\Local\Temp\Low
Step 2: Delete all files in the Low Folder
Step 3: Then launch TechTOOLS and download the flash for the vehicle again
Step 4: Launch the DRBIII Emulator and try the flash again and it should work.

Enjoy!

2019/07/24

How to set up DRB III emulator step-by-step?

Here are steps to install DRB3 emulator for Chrysler diagnosis and programming.

DRB III Emulator definition:
DRB III Emulator is the exact scan tool software application used in Chrysler, Jeep, and Dodge dealerships to service non-CAN based vehicles from 1998-2007.

Installation Notes:
In order to install the Enhanced DRB III Emulator, you must have the wiTECH Diagnostic Application (wiTECH 1.0) installed as well as all supporting software.

The wiTECH 1.0 can be downloaded and installed on a Windows PC from DealerCONNECT (DealerCONNECT > Service > wiTECH Information (Under the SERVICE TOOLS & EQUIPMENT section) > Legacy Tools > wiTECH Software Installer).

In order to install DRB III Enhanced Emulator you must have a microPod II Device that has Entitlements for the Enhanced version. This is different that those for the wiTECH Diagnostic Application (wiTECH 1.0) or the Original DRB III Emulator. This microPod II Device will only work with the wiTECH Diagnostic Application (wiTECH 1.0) and Enhanced DRB III Emulator.

DRB3 Emulator: Worked with MicroPod 2 or VCI Pod?
MicroPod 2 original: Yes!


Steps to DRB3 Emulator on Win7/Win10:
1. Connect the microPod II device that will be used with Enhanced DRB III Emulator to a Windows computer that has the wiTECH Diagnostic Application (wiTECH 1.0) either through the USB-microUSB cable or by plugging the microPod II device into a vehicle’s OBDII port and having both the microPod II device and the computer on the same wireless network.
2. Use the following link to add a wireless profile to the microPod II, if not already done: https://kb.fcawitech.com/article/330/how-to-configure-wireless-settings-on-a-micropod-ii-setup-for-enhanced-drb-iii-emulator-832.html
3. Open the wiTECH Diagnostic Application (wiTECH 1.0) and look for the microPod II device in the connection wizard.
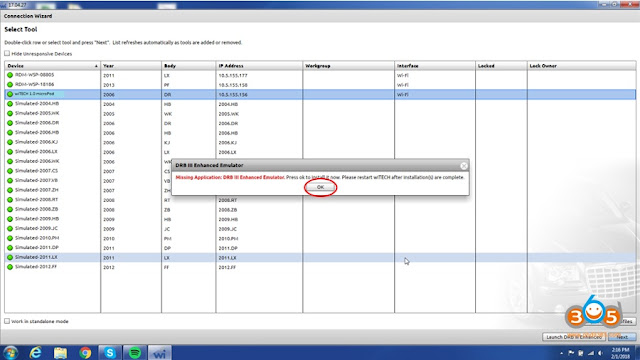
4. In the example below, the microPod II device name is “wiTECH 1.0 microPod.” It has been discovered over Wi-Fi and USB.
install-drb3-emulator-1
5. Once the device is found in the connection wizard, click on the name.
6. Clicking on the name will cause the “Launch DRB III Enhanced” button to appear to the left of the “Next” button in the bottom right corner.
7. If the button appears with “Launch DRB III” with no “Enhanced”, you will need to contact the Help Desk to get the Enhanced entitlements added.
install-drb3-emulator-2
8. Click the “Launch DRB III Enhanced” button and accept the EULA that is presented. A warning will be presented indicating that Enhanced DRB III Emulator is not installed. Press “OK” to start the installation process.
install-drb3-emulator-3
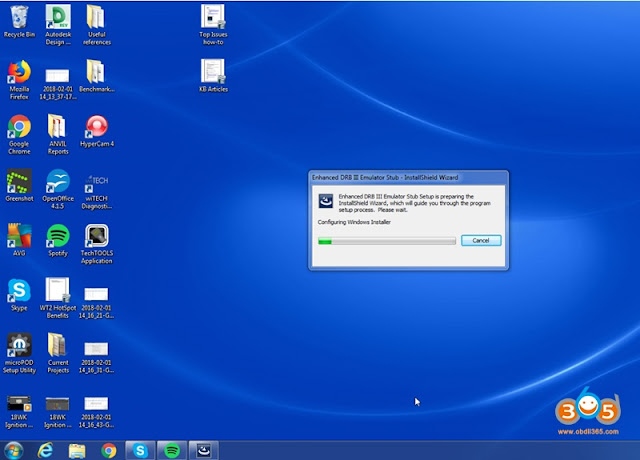
9. The wiTECH Diagnostic Application (wiTECH 1.0) will now close and the “Enhanced DRB III Emulator Stub” will begin to install. Follow through any dialog prompts to continue the installation.
install-drb3-emulator-4
10. With the “Enhanced DRB III Emulator Stub” installed, select the check box for “Enhanced DRB III Emulator Application vx.xx.xxxx” and click the “Install” button in the bottom right corner of the window.
install-drb3-emulator-5
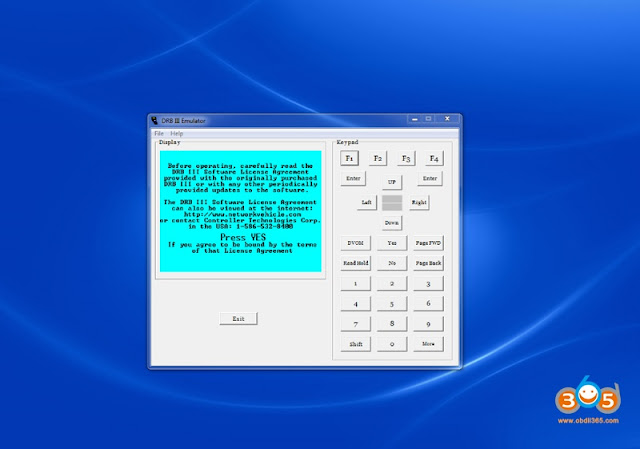
11. Follow through any dialog prompts to complete installation. Once installation has completed, open the wiTECH Diagnostic Application and select the microPOD II device using the Connection Wizard. Click the “Launch DRB III Enhanced” to open the Enhanced DRB III Emulator. The emulator will appear as shown below if you are connected to a vehicle.
install-drb3-emulator-6
Note: You must be connected to a vehicle in order to launch the DRB III Enhanced Emulator.

Disclaimer: this instruction is copied for sharing info only, not originated from obdii365.com. It’s your own risk! Good luck!