Showing posts with label DRBIII. Show all posts

2020/07/16

How to Program Chrylser RKE with DRB III Scan Tool?

All  you need to do is program old fob (RKE) to the replacement CTM using DRB-III after get a CTM replaced. This is confirmed using an official DRB-III emulator and WiTech VCI pod.
Programming the RKE (Remote Keyless Entry) transmitter access codes requires the use of a DRB III scan tool, so if you need to replace one or want a spare you’ll need to visit your local dealer to have this done.

programming methods A thru D. Only Methods A thru C are applicable to Jeep vehicles and only from 1999 to 2002. Methods A & B are Customer Programing Methods that can be found elsewhere on other websites. Method C is a Dealer Programming Method that requires the use of a DRB III scanning tool.

SUBJECT:
Remote Keyless Entry (RKE) Programming Procedures
MODELS:
1999 – 2002 (AB) Ram Van/Wagon
1999 – 2002 (AN) Dakota
1999 – 2002 (BR/BE)Ram Pickup
1999 – 2002 (DN) Durango
2002 (DR) Ram Pickup
2001 – 2002 (JR) Sebring Sedan/Stratus Sedan/Sebring Convertible
2002 (KJ) Liberty
1999 – 2002 (LH) Concorde/Inytrepid/LHS/300M
1999 – 2000 (NS) Town & Country/Caravan/Voyager
1999 – 2002 (PL) Neon
1999 – 2002 (PR) Prowler
2001 – 2002 (PT) PT Cruiser
2001 – 2002 (RS) Town & Country/Caravan/Voyager
1999 – 2002 (WJ) Grand Cherokee
1999 – 2001 (XJ) Cherokee

NOTE: PLEASE READ INSTRUCTIONS FULLY BEFORE ATTEMPTING TO PROGRAM TRANSMITTERS.
Program Method A (Customer Program Method)
1. Press (LOCK) button 5 times at 2 second intervals to resynchronize transmitter. Attempt to function transmitter, if working as designed discontinue programming.
2. Turn ignition to run position. (Allow ignition chimes to stop).
3. Using any original (working) transmitter, press the [UNLOCK] button for 4 to 10 seconds.
4. Within the specified 4 to 10 seconds, continue pressing the [UNLOCK] button and press the [PANIC] button for 1 second and release both buttons (AN/DN release
either button first). A chime will sound to indicate that the transmitter programming mode has been entered (allow 3 seconds for chime to sound).
5. Press [LOCK] and [UNLOCK] buttons simultaneously for 1 second and release (a short chime will sound for AN/DN).
6. Press and release any button on the same transmitter and a chime will sound after successfully programming the transmitter (locks will cycle for AN/DN).
NOTE: (FOR DR 0NLY ) A CHIME WILL NOT SOUND ON STEP #6 FOR THE FIRST TRANSMITTER PROGRAMMED, BUT WILL SOUND UPON PROGRAMMING THE SECOND TRANSMITTER.
7. Repeat steps 5 through 6 to program additional transmitters.
8. Turn ignition to OFF position. Transmitter programming mode will discontinue after 60 seconds (30 seconds for AN/DN and RS). (All transmitter programming must be completed within time specified).

Program Method B (Customer Program Method)
1. Press [LOCK] button 5 times at 2 second intervals to resynchronize transmitter. Attempt to function transmitter, if working as designed discontinue programming.
2. Turn ignition to the run position (Allow ignition chimes to stop).
3. Using original transmitter, press and hold the [UNLOCK] button on the transmitter for between 4 and 10 seconds.
4. Continue to hold the [UNLOCK] button and press the [PANIC] button. A chime will sound to indicate that the transmitter programming mode has been entered (Allow 3 seconds for chime to sound).
5. Press a button on all transmitters to be programmed into the system including any previously programmed transmitters; a chime will sound when each transmitter has been programmed.
6. Turn the ignition to OFF position to exit the transmitter programming mode.

Program Method C (Dealer Program Method) *Can be used for any type transmitter.
1. Press [LOCK] button 5 times at 2 second intervals to resynchronize transmitter. Attempt to function transmitter, if working as designed discontinue programming.
2. Turn ignition to the run position (Allow ignition chimes to stop).
3. Plug DRB III to vehicle’s 16–way data link connector.
4. Follow Service Manual and DRB3 instructions to program transmitters.

Program Method D (For use with AB vehicles not equipped with VTSS only)
1. Locate the dark green program enable wire connected to pin #1 of the 16-way data link connector under the left side of the instrument panel.
2. Connect the program enable wire terminal to a good ground.
3. Insert the key into the ignition and turn the ignition switch to the ON position. The power locks will cycle (Lock and Unlock) indicating that program mode has been entered.
4. Using the transmitter to be programmed, press either [LOCK] or [UNLOCK]. The power locks will cycle indicating the transmitter has been programmed successfully.
5. Repeat step 4 to program additional transmitter.
6. Disconnect the program enable wire from ground to exit program mode.
7. Turn the ignition to the OFF position and remove the key.
NOTE: REFER TO DAIMLERCHRYSLER MDS2 SYSTEM OR PARTS DEPARTMENT TO OBTAIN THE CORRECT PART NUMBER AND REVISION FOR SPECIFIED VEHICLE.

Example: Programming new RKE  remotes/FOBs for the Jeep Cherokee XJ
Just for sharing purpose. Credit to http://colorado4wheel.com.
This is a “how-to” reprogram the RKE (Remote Keyless Entry) remotes/FOBs in the Jeep Cherokee XJ. This procedure is the same for 1997-2001 Cherokees, 1997/1998 Cherokees use a different remote than the 99-01 Cherokee that seems to interchange with all 97-01 Cherokee’s. 1996 and older Cherokees have a different programming procedure for the IR remotes. In theory it would be possible to swap in a programmed pair of remote and board to a 1996 and older for the improved remote range.
From the main menu, select #1, DRBIII standalone.
drb-iii-program-chrysler-rke-1
Select #1, 1998-2007 Diagnostics.
drb-iii-program-chrysler-rke-2
Select #1, All.
drb-iii-program-chrysler-rke-3
Select #7, Theft Alarm.
drb-iii-program-chrysler-rke-4
Select #1, VTSS.
drb-iii-program-chrysler-rke-5
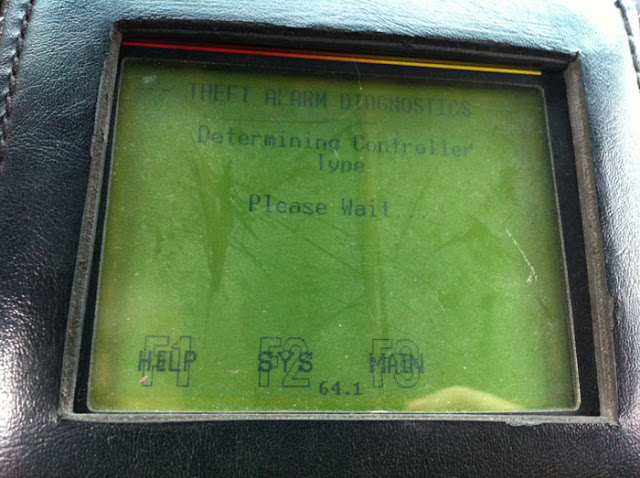
Detecting.
drb-iii-program-chrysler-rke-6
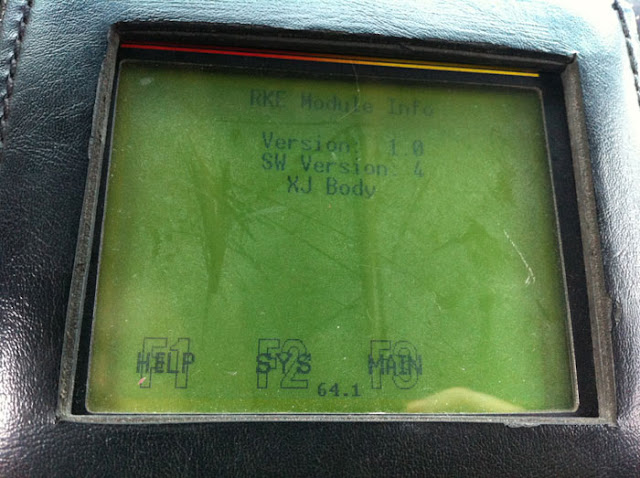
This will display after first detection.
drb-iii-program-chrysler-rke-7
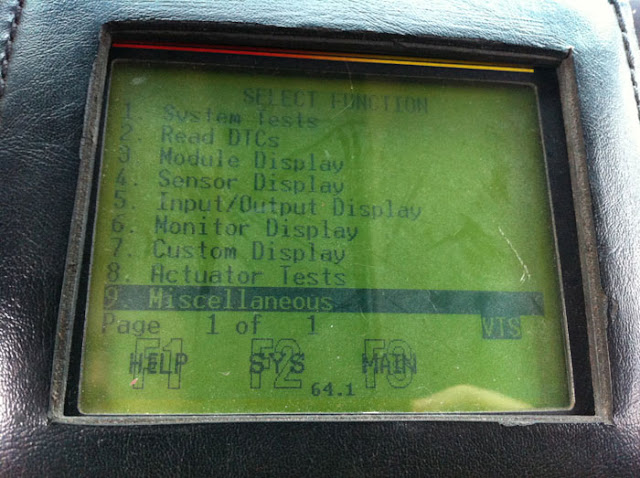
Select #9, Miscellaneous.
drb-iii-program-chrysler-rke-8
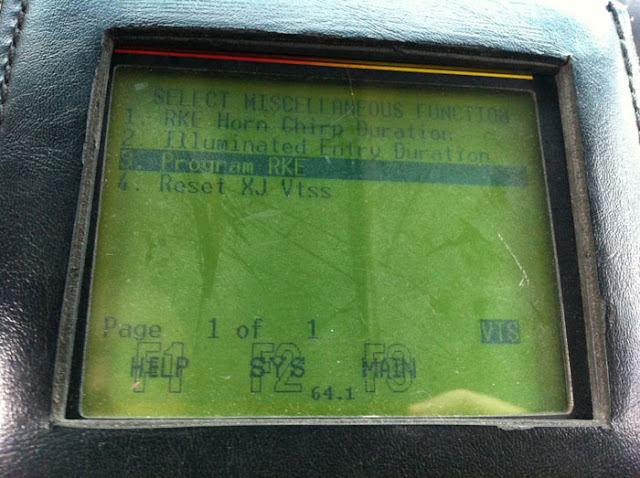
Select #3, Program RKE.
drb-iii-program-chrysler-rke-9
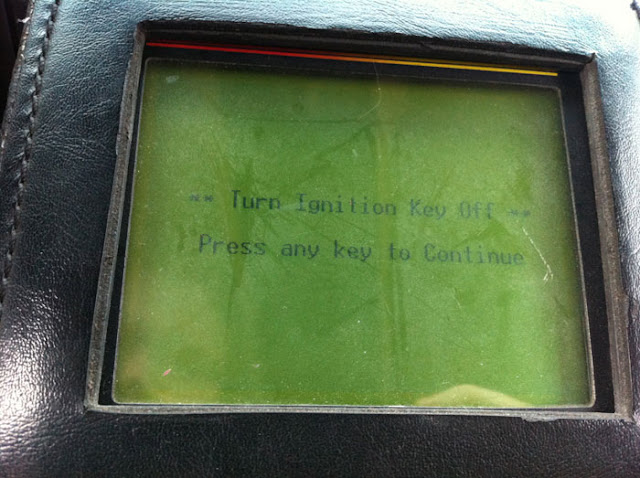
If the ignition is not off, turn it off.
drb-iii-program-chrysler-rke-10
Select which position remote you want to program for. Defaults are 1 and 2, Recommend having all the remotes available for programming, otherwise another remote might get overwritten.
drb-iii-program-chrysler-rke-11
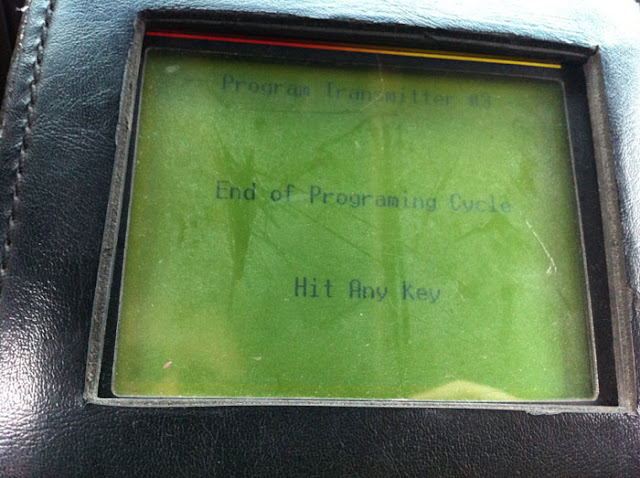
The RKE will accept a signal for a few seconds, press unlock repeatedly during this time. After the end of the cycle this will display, even if the programming was not successful. Test the remote by pressing lock and unlock, if it does not activate then it is not working properly and either needs to be programmed again or it is a bad remote.
drb-iii-program-chrysler-rke-12
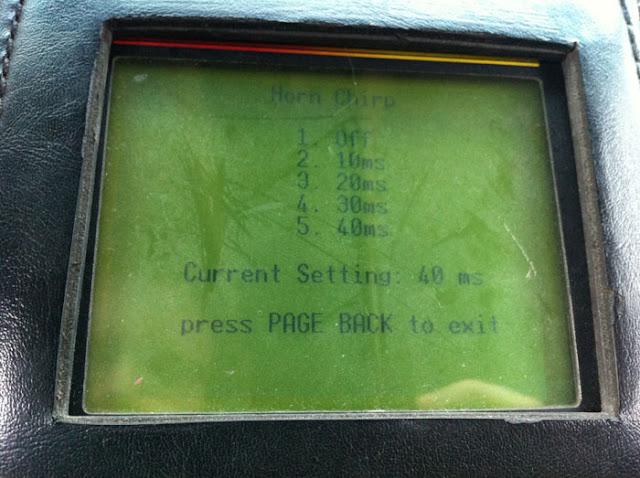
Select 1 to change the horn chirp duration.
drb-iii-program-chrysler-rke-13
10ms is almost inaudible, 40ms is very noticeable. User preference.
drb-iii-program-chrysler-rke-14
Illuminated entry can also be set. User preference.
drb-iii-program-chrysler-rke-15
While many remotes appear to be physically identical actual compatibility varies. Verify part numbers before purchasing remotes.

2019/01/23

How to reprogram Chrysler PCM witg DRB III?

Look here: Procedure in detail will be of interest to those contempating a PCM change
After reading this, it is obvious that PCMs can be reprogrammed.
I have flash DVD for the DRB III, hopefully I will get it and can then do programming on a “swap” system. Keeping my fingers crossed.
It is Chrysler’s new “policy”
Mopar® is currently phasing out pre-programmed PCMs for the vehicles listed. New
modules will no longer be pre-programmed when received from Mopar®. Replacement of
future PCMs will require programming utilizing the DRBIII and TechCONNECT. The PCM
will not operate the engine until it is programmed. A Diagnostic Trouble Code (DTC) will be
set – “not programmed”.
CAUTION: Extreme care must be taken when programming a calibration into a
generic PCM. Do not randomly select a calibration. Once a calibration is
selected and programmed, the controller cannot be reprogrammed to a
different calibration. The module can only be reprogrammed to a more
recent version of that calibration.
When flashing a 2002 – 2004 LH vehicle the BCM may need to be
disconnected if experiencing failures during the flash of the transmission
portion of the PCM. The BCM will need to be disconnected after the module
ID portion of the flash is complete. Before pressing Page Forward to begin
the flash of the PCM Turn the Key to the OFF position and disconnect the
BCM. Then turn the KEY to the RUN position and Press Page Forward to
begin the PCM flash session.
NOTE: If this flash process is interrupted/aborted, the flash should be restarted and
then follow the directions on the DRBIII emulator.
Step 1. Before beginning the reprogramming procedure, remove any old flash reprogramming
files from the DRBIII memory. To clear the memory from the MAIN MENU power up
the DRBIII and then:
a. Simultaneously press the “MORE” and “YES” keys.
b. A screen will appear requesting a “COLD BOOT”.
c. Follow the on screen instructions by selecting the “F4” key.
d. When the DRB III® reboots to the MAIN MENU, proceed to Step 2.
NOTE: If your vehicle is a 2002 LH and the original PCM part number begins with 04
the technician should use the 2002 LH Part Number Reference chart above to
determine the corresponding “NEW” part number. This new number from the
chart should then be entered into the Tech tools application as the orginal
part number. If the original PCM number begins with 05 no change to the
flash selection process is required.
Step 2. With the ignition switch in the “RUN” position, determine the original part number of the
PCM currently in the vehicle. Using the DRBIII select:
a. “DRBIII Standalone”
b. “1998 – 2004 Diagnostics”
c. “All (Except Below)”
d. “Engine”
e. “Module Display”
f. Record the first ten (10) characters of the “PCM part #” on the repair order for later
reference.
NOTE: If the PCM is not operational, the part number can be obtained from the label
on the old controller. If the label on the controller is not legible, proceed to
next step.
Step 3. Page back to the “Main Menu”
Step 4. Determine if the vehicle is equipped with SKIM. Using the DRB3 select:
a. “DRBIII Standalone”
b. “1998 – 2004 Diagnostics”
c. “All”
d. “System Monitor”
e. “J1850 Module Scan”
f. Look for “SKIM” in the list of modules.
Step 5. If the vehicle is not equipped with SKIM then proceed to step 6. If the vehicle is
equipped with SKIM obtain the vehicle Personal Identification Number (PIN) before
continuing with step 6. This information is available from one of the following:
a. The original selling invoice.
b. The DealerCONNECT system under the “Sales” or “Parts” tabs – select “Key
Codes”.
c. By contacting the DaimlerChrysler Customer Assistance Center (DCCAC) at
1-800-992-1997.
CAUTION: Failure to install the SKIM pin number into the module after flashing the
PCM will cause a start and stall condition.
Step 6. Replace the PCM using the appropriate generic control module. Refer to the service
information available in TechCONNECT or the appropriate service manual in Section
8E, Electronic Control Modules, Powertrain Control Module, Removal/Installation.
Step 7. Open the hood, install a battery charger and verify battery state is above 11.5 volts.
Step 8. If the old “PCM part #” is known, proceed to step 14. If the old “PCM part #” is not
known, proceed to next step.
Step 9. On DealerCONNECT select the “Service” tab.
Step 10. Select “Vehicle Information Plus”.
Step 11. Manually enter the VIN and mileage and select “Enter”.
Step 12. Select the “Vehicle Option” tab.
Step 13. Under the “Vehicle Option” window, identify and record:
a. Engine.
b. Emissions (Federal or California).
c. Transmission (Automatic, 5-speed manual, etc.).
Step 14. Connect the DRBIII to TechCONNECT and the vehicle. Open TechTOOLS and
verify that the “DRBIII Status: Connected” message is in the upper right corner of the
TechTOOLS screen.
Step 15. TechTOOLS should automatically populate the VIN in the “Vehicle Criteria” area and
the available updates. If not, manually enter the VIN then TechTOOLS will populate
the available updates.
NOTE: Do NOT enter the generic controller part number in step 16a below.
Step 16. Determine the proper calibration:
a. If the old “PCM part #” is known, enter the part number of the old controller in the
“Parts Criteria” p/n window. Proceed to step 16.
b. If the old “PCM part #” is not known, select the correct calibration based on the
information that was recorded from “Vehicle Options” in step 13.
Step 17. Select the correct calibration.
Step 18. Select the “Download/Update” button.
Step 19. Monitor the “Flash Download/Update Progress” window on the TechCONNECT and
follow the instructions on TechCONNECT/DRBIII. When the flash process is
completed, proceed to next step.
Step 20. Enter the VIN in the PCM. Using the DRBIII select:
a. “DRBIII Standalone”
b. “1998 – 2004 Diagnostics”
c. “All”
d. ”Engine”
e. “Miscellaneous”
f. “Check VIN”
g. If the vehicle is not equipped with SKIM proceed to step 20h. If the vehicle is
equipped with SKIM follow the directions on the DRBIII. When the VIN and SKIM
key has been programmed, proceed to step 20.
h. Enter the VIN as requested by the DRBIII.
Step 21. Update the PCM mileage. Using the DRBIII select:
a. “DRBIII Standalone”
b. “1998 – 2004 Diagnostics”
c. “All (Except Below)”
d. “Engine”
e. “Miscellaneous”
f. “Check PCM Odometer”
g. “NO”
h. Enter the current odometer mileage and then press “Enter”.
-9- 18-006-04 REV. B
i. Cycle the ignition key to the OFF position and back to the ON position and then
press “Enter”.
Step 22. Proceed as follows:
a. If the vehicle is equipped with an automatic transmission, proceed to step 24.
b. If the vehicle is equipped with a non-turbo engine and manual transmission, it is not
necessary to set the pinion factor. Proceed to step 24.
c. If the vehicle is equipped with a Turbo engine and manual transmission, proceed to
step 23.
Step 23. On vehicles equipped with a Turbo engine and manual transmission, set the Pinion
Factor. Using the DRB III select:
a. “DRBIII Standalone”
b. “1998 – 2004 Diagnostics”
c. “All (Except Below)”
d. “Engine”
e. “Miscellaneous”
f. “Pinion Factor”
g. Select the correct tire size and then select “Page Back” to exit.
h. Proceed to step 24.
Step 24. On vehicles equipped with an automatic transmission, set the Pinion Factor. Using the
DRBIII select:
a. “DRBIII Standalone”
b. “1998 – 2004 Diagnostics”
c. “All (Except Below)”
d. “Transmission”
e. “Transmission Module”
f. “Miscellaneous”
g. “Pinion Factor”
h. Select the correct tire size and then select “Page Back” to exit.
i. Enter “Quick Learn” and then follow the instructions on the DRBIII.
NOTE: Due to the PCM programming procedure, a DTC may be set in other modules
(TCM, BCM, MIC, SKIM, etc.) within the vehicle, if so equipped. Some DTC’s
may cause the MIL to illuminate. Check all modules using “Module Scan”,
record the DTC’s, and erase these DTC’s prior to returning the vehicle to the
customer. Erase any DTC’s in the PCM only after all other modules have had
their DTC’s erased.
NOTE: The following step is required by law.
Step 25. Type the necessary information on the “Authorized Modification Label” p/n
04275086AB and attach near the VECI label (Fig. 1).


You have to know: esp. for newbies

You’d better take a VCI Pod for use with DRB iii, NOT the clone Micropod 2 (even the high quality SP271-C1 cannot work good with DRB emulator. ) look here: http://blog.obdii365.com/2019/01/16/drb3-emulator-worked-with-micropod-2-or-vci-pod/ tested on 300M. VCI Pod says yes but Micropod2 clone cannot work….

2019/01/22

DRB III Review on Chrysler 300M ABS Bleeding

Here’s something good i found when i bled ABD for my 300M. Very useful…. Hope it works for you guys also.

Complaints i posted in https://300mclub.org/forums/:

I noticed something with my car that I wanted to comment on since “testing” my ABS for the first time this season. After arriving to school just in time for a final I put my foot down hard on the brake while pulling into the gravel lot, which was frozen over just like a skating rink. As I fully anticipated the ABS came on and was effective. However, once I came to a complete stop the pedal went soft and I had to pump it 6 or 7 times before it firmed back up (no jokes please). I have noticed my brake pedal is a little softer than most other LH cars I have driven but I have never noticed variance like this after ABS braking. I am very familiar with braking using ABS in my car and I think this is something abnormal.

Tips I got from user97:
Did the fluid level drop — if it did, then you probably got a leak somewhere and air in the system.

If the fluid level is OK but pedal is softer after ABS engagement, there is a possibility that a valve in the ABS system did not close fully.

In order to provide anti-lock capability, ABS unit has the ability to isolate any wheel from the M/C pressure as well as relieve the pressure into a temporary storage (accumulator). The ABS pump then pumps the excess fluid back into the M/C (hence pedal pulsing).

There is a possibility that the valve on one wheel has not completely closed and allows bleeding into the “accumulator”. As ABS system is not engaged, the pump will not start to empty the accumulator. So you are basically compressing the accumulator spring before any significant brake action on that circuit would commence. Accumulator has a rather small volume, so it would reach capacity pretty quickly. I noticed that there is a significant amount of rust that builds up in the brake fluid as the lines rust from inside due to moisture accumulation. May be a flake of rust got stuck in the valve and provides a miniscule leak into accumulator. ABS monitors state of the valves — anything significant would trigger an ABS fault.

It might be something else, like M/C leaking internally past pistons. But on the off chance, I would exercise ABS a few more times. Valve action would most likely cure the issue if it is the problem.

Search on Youtube and there is some video that illustrates ABS HCU operation
(AFAIK, on our cars ABS controls rear wheels independently rather than as a pair).

Playing with DRB III, you discover how potent ABS system is. When running ABS HCU test, it instructs you to apply pressure to the brake (with engine off/booster bled). Then ABS valves open up, filling up accumulators. It is very impressive — pedal falls to the floor without any resistance. As the next stage of the test, it closes the valves and turns on the pump, which literally pumps the pedal back to the original state. While I knew how ABS worked in general terms, I never realized the degree to which ABS could potentially interfere with normal brake system. No wonder, the unit is designed to be so fail safe, as to prevent such failures (turns itself off at the slightest sign of trouble).

Normally, there should be no need to bleed ABS, as long as MC was never run dry, you should be OK. I would be careful about sucking fluid out of MC — a little is OK, just make sure that neither half gets empty to prevent air injection.

On a side note, for DRB iii, you’d better use VCI Pod, NOT the clone Micropod 2 (even the high quality SP271-C1 cannot work good with DRB emulator. ) look here: http://blog.obdii365.com/2019/01/16/drb3-emulator-worked-with-micropod-2-or-vci-pod/ tested on 300M. VCI Pod says yes but Micropod2 clone cannot work….
witech-v17-review

2018/11/06

Micropod 2 wiTech/DRB3 Review: 1997-2018 Chrysler Dodge Jeep Fiat

Look here: clone Micropod 2 test reports

Software to test with: wiTech and DRB3 software
Cars to test: 1997-2018 Chrysler, Dodge, Jeep, Fiat
Functions to test: basic diagnostics, key programming, reflash programming, module flashing, ABS bleeding

Test reports from users: (thanks for all the input)

2018 Jeep Wrangler:
FOBIK key programming done!
Car: 2018 JEEP WRANGLER 3.5L V6 24V WT ENGINE UPG I W/ESS

2016 Chrysler, Dodge, Jeep, Fiat:
100% CAN – equipped coverage to 2016 for Chrysler, Dodge, Jeep, and Fiat vehicle
Provide basic OBDII diagnosis
Have access to module for Re-Flash Programming, TSBs, wiring diagrams, and repair information.
Btw, wiTech ii supports chrysler and Fiat online programming, but the package from the vendor comes without  fiat software; i have my own micro pod 2 fiat software so that i can installation and programming. )

2015 Grand Cherokee:
Grand Cherokee 2015 RFHUB modify CRC and VIN
It’s really simple with micropod in offline mode . Just replace it .... and restor vehicle config.

2015 Chrysler 200:
The 2015 Chrysler 200, along with other Fiat-based models like the Jeep Renegade, Jeep Cherokee, and Ram Promaster, are all equipped with a rolling PIN Code.
Managed to program fobik with wiTECH app, when the 200 lost all keys

2015 RAM:
I traded in my 2015 RAM for a 2017 and confirmed that the wmicropod clone works with wiTech 17.04 patch level 11 works on my 2017 RAM.

I've heard rumblings that they changed things for the 2018 MY - doubt they will work.


2015 WK 3.6L and 2015 DS 5.7L:
I connected it to my 2015 DS and my wife's 2015 WK with no issues. I disabled the side view mirror tilt in reverse on her WK (only thing she didn't like about it) and she was thrilled. There are functions to bleed ABS, program tire sizes, etc. There are literally hundreds of sensor readings, dozens of tests, actuators and misc functions that you can perform that seem to be very vehicle specific - which you would expect. Every switch/gadget in the vehicle seems to have a corresponding sensor reading of some kind in the software. The only odd behavior I saw was when I connected to the ABS computer of my DS... the EVIC freaked out and started screaming to service the ABS. Maybe that is a safety feature of some kind so folks don't go driving while messing with the ABS computer? Powering the vehicle off and on again made the ABS warning go away. I could not find any "PROXI alignment" functions - maybe they don't apply to my vehicles?

2014 dodge avenger:
One vehicle i tested with: a 2014 dodge avenger …. just fine.
was able to flash a module update and program a new key with the unit.
try the emulator on: DRB III emulator confirmed working.

2010 Charger:
I tested it on a 2010 Charger under witech and works flawlessly

2006 Jeep Liberty:
2006 Jeep Liberty CRD Limited 4X4
I ordered a witech micropod2 clone with drb3 functionality.
MicroPod II comes with version 17.04.27 software, drb3 support is not installed automatically but can still be found after install. Says it’s good for offline use only, but that should be enough to mess with the TPMS.
All modules except the BCM and ABS computer are still compatible with the DRBIII on the 06’s.
This is a working offline Witech. I just got it connected successfully. Software V17.04.27 was installed on a Windows 7 laptop no problem. It did successfully populate the VIN and can read the ECU.

2004 Dodge:
got a 2004 Dodge pickup and under the emulator worked perfectly.

2003 PT Cruiser:
Basically no other modules other than the Engine, work. I cannot connect to the transmission, ABS, VTSS, SKIM, radio, cluster, etc. But everything in the engine module can be tested, actuated, etc.
Luckily for me, I really only needed the DRBIII to write the Pinion factor for manual transmissions, which is conveniently in the ‘engine’ part which works.
Maybe I really need to invest in an older VCI pod so that everything else works.

Chrysler after 2003:
Micropod 2 with wiTECH only works for Chrysler made after the year 2003

old Chysler 1997 – 2004 (2005):
Micropod 2 work well with DRBIII emulator for old Chysler the year 1997 – 2004 (2005)

Good to know: When to use DRB3 & when to use wiTech? 
The DRB3 emulator is part of Chrysler’s Witech software. The Witech software supports two different pass-through devices, The VCI pod which is sold with the Witech system and the Chrysler Starmobile. The DRB3 emulator is a convenience item for dealerships to allow the use of their current witech scan-tool on older non CAN bus vehicles. It is not by any means a cost saving option.

Attachment: Micropod 2 DRB 3 Emulator Car List:
DRB 3 supports Chrysler, Jeep, and Dodge dealerships to service non-CAN based vehicles from 1998-2007

Images: cloned Micropod 2 full kit
micropod2-kit-1

micropod2-kit-2

micropod2-kit-3

micropod2-kit-4

micropod2-kit-5


2018/10/31

How does Witech Micropod 2 work on PT Cruiser & Dodge

I’m happy to report that my clone wietch Micropod 2 off obdii365.com does work, this unit doesn’t use a HDD, just install witech natively, it comes with witech 17.04 and drb 3 as well. This is what I have.

Look here
micropod-review-on-dodge-1
It’s a small package, coming with a VCI pod, a usb cable and a CD inside software
micropod-review-on-dodge-2
Pins inside the VCI pod connector are built well and I’ve never had connection issues
micropod-review-on-dodge-3
Sticker lol…. put it on and it’s definitely same as the original
micropod-review-on-dodge-4
And also on the CD it has wiTECH software version 17.04.27 – it’s the newest version tested by their professionals.
and also it has the DRB stub, DRB emulator, Enhanced DRB Stub and three versions of the Enhanced emulator.

The wiTECH installation is easy with the help of a Youtube video they’ve uploaded.
And DRBIII emulator with Micropod 2 is an old topic on the web. This is the tutorial i’m using. http://blog.obdii365.com/2018/06/16/install-drbiii-emulator-for-micropod-2-on-windows-7/
This guy has the same Micropod as me. It did work!

So far, I have the Micropod 2 on three cars.

DRBIII emulator + 2003 PT Cruiser: works  (the main things lol)
DRBIII emulator + 2004 Dodge: works
wiTECH + 2010 Charger: works

Btw, Micropod 2 with DRBIII emulator work for old Chysler the year 1997 – 2004 (2005)
And with wiTECH only works for Chrysler made after the year 2003

First, I tested on a 2003 PT Cruiser.

Basically no other modules other than the Engine, work. I cannot connect to the transmission, ABS, VTSS, SKIM, radio, cluster, etc. But everything in the engine module can be tested, actuated, etc.
Luckily for me, I really only needed the DRBIII to write the Pinion factor for manual transmissions, which is conveniently in the ‘engine’ part which works.
Maybe I really need to invest in an older VCI pod so that everything else works.

Then, I also tested it on a 2010 Charger under witech and works flawlessly, and got a 2004 Dodge pickup and under the emulator worked perfectly.


Edit to update:
I already called my locksmith, who drives an 04 Sprinter to try it as well.


So I had a chance to test my Micropod II with not only wiTECH but also the DRBIII enhanced emulator. Both work good!


Say thanks if it helps ðŸ˜€

2018/10/26

How to install DRBIII for Micropod2 on Windows 7

Confirmed! Clone wiTech Micropod 2 Chrysler diagnostic interface is working good with DRBIII Emulation!

Look at the post here:

Thanks to Radius for the info he provided in the first post along with information provided by ShufStiX in various other threads. I PM’d for the link PW after giving +rep and thanks but never heard back so I ordered my MicroPod2 from obdii365.com. It came without a hard drive but included a disk that had folders for both the 17.03.01 and 17.04.27 versions of wiTECH software along with third folder with DRBIII software. I went at getting everything working with what was here and some trial and error. After a couple different Windows installs and combinations of software versions, I finally got everything to work. I haven’t used anything outside of the DRBIII emulator as I need this only for the Chrysler Crossfire so I don’t know how the instructions below will affect use of the wiTECH software but they work perfectly for the DRBIII emulator part.

1: Start with a fresh install of Windows 7 Pro 32-bit.
2: Install all the necessary drivers for your laptop.
3: Set the clock to the current date and time. (It didn’t work when set to 01/01/2017)
4: Connect to WiFi and performed all necessary Windows Updates.
5: Copy the “wiTECH_Install_17.03.01” folder to the desktop.
6: Install the provided version Adobe AIR.
7: Install the provided version of Java.
8: Install wiTECH 17.03.01.
9: After you have finished installed everything, when you get popup messages from Windows Firewall to allow or block any applications, click “Allow”.
10: When you get a popup for AdobeAIR and Java to update, click cancel and do NOT update either AdobeAIR or Java.
11: Open “My Computer” and in the upper left of the window, click on “Organize” and then select “Folder and search options”.
12: Click on the “View” tab and under “Hidden files and folders” select the radio button for “Show hidden files, folders and drives”. Also, uncheck the option for “Hide protected operating system files (Recommended)” and then at the top of the window, click the “Apply to Folders” button.
13: Navigate to “C:\ProgramData\wiTECH\jserver\data\core\stubs” and you will find three installers.
14: Install the DRBIII Emulator stub.
15: Wait for a popup to appear that states the security certificate isn’t valid and click “OK” to allow the software update to proceed. Another popup will appear and the software update will run. After it completes, close the wiTECH window if it opens.
16: Install the Enhanced DRBIII emulator stub.
17: Again, wait for a popup to appear that states the security certificate isn’t valid and click “OK” to allow the software update to proceed. Another popup will appear and the software update will run. After it completes, close the wiTECH window if it opens.
18: Install the K-Line stub.
19: Again, wait for a popup to appear that states the security certificate isn’t valid and click “OK” to allow the software update to proceed. Another popup will appear and the software update will run. After it completes, close the wiTECH window if it opens.
20: Connect the MicroPod2 to the vehicle, then connect it to the computer.
21: A popup window will appear to install software. Click “OK”.
22: After it finishes, start wiTECH 17.03.01 and wait for the screen to show up with the MicroPod2 and IP address of it. You will see a “Launch DRBIII” button in the lower right corner. Ignore it as they do not properly open the emulator.
23: Create a shortcut on the desktop and enter the following into the ‘Path” field.

http://localhost:9876/launchExternalApp?appName=drb_iii_enhanced_emulator&locale=eng_ENG&deviceIp=172.22.22.22

24: Disable the LAN and WLAN network connections and never connect to the internet again.
25: Click on the shortcut and you’re set! The DRBIII emulator will open and give you the choice to select several different vehicles.

Again, I want to thank Radius and ShufStiX for the info they provided.


Big thanks to rcompart who posted the info with we all.
review-drb3-micropod

IMPORTANT:
PLEASE MAKE SURE OF YOUR SOURCE OF MICROPOD 2 CLONE. THE METHOD HERE ONLY WORK WITH UNITS FROM http://www.obdii365.com/wholesale/witech-micropod-2-diagnosis-programming-for-chrysler.html. IF YOU HAVE CLONED MICROPOD 2 FROM OTHER SELLERS, YOU’RE TRYING ON YOUR OWN RISK AND NO ONE WILL HOLD RESPONSIBILITY OF WHAT YOU HAVE DONE.